We asked several MLB and MiLB groundskeepers for their thoughts on building and maintaining baseball pitching mounds. Here is their advice:
Larry DiVito, Minnesota Twins
When you are building a mound from scratch or doing a substantial renovation, it is vital that you first consider your infield turfgrass. If it is a new construction, make sure to set your home plate and pitching rubber locations and elevations well in advance of any finish work on the rootzone. You will want to transport all of the material to the mound efficiently without causing changes in your field grade or contaminating your rootzone material with spilled mound clay.
If doing a renovation, think about how to get material off of and to the mound without wearing a traffic path on your turfgrass. This may entail picking up and rotating flooring to vary the route to and from the mound. Finally, buy some bender board to use as a temporary border around the mound circle. This will keep clay from migrating into the rootzone during your project.
While you can build and compact the base of the mound out of your stock of infield mix, it is important to not skimp on mound clay in the critical areas around the pitching rubber and in the landing area. Generally, if mounds are maintained regularly and tarped when not in use, a solid 4 inches of mound clay will be adequate to build up these areas. Personally, I like to set the landing area with about 6 inches of clay for stability at the professional level.
If the product you choose to use is not ready to go out of the bag, it is better to blend and moisturize the clay in another area first, then bring it to the mound with wheelbarrows. Always tamp and compact in lifts, no more than 2 inches of depth at a time. To ensure stability in the mound right away, you want to avoid any air pockets as you pack the clay.
Ideally, you would work the clay in two or three lifts and then finish with a quarter-inch top layer as you hand grade your slope to the rulebook specifications. If you have good clay, good people, and well-built, 8-inch square tamps, you can renovate a mound without a plate compactor. The most important factor is seeing that you have the moisture right with your clay. As you add material, be sure the base clay is slightly moister than the product you are adding. Also, before each layer I like to scarify the base material with a sharp rake or hand tool so the new clay will bond to it.
Clay mix selection will depend on various factors. You will need to check with your local vendors to find what is available and will continue to be around for you in the future. While bagged material may cost a bit more than bulk product, you can expect much less waste and easier storage with bagged clay. There are many quality mound clay products on the market today for sports turf managers. Keep in mind that the product you use will generally not be 100% clay. There may be some silt and sand in it as well.
The materials I enjoy using pack well, but have a small bit of grit to them as well. This can help reduce slickness of the clay product on wet or dewy nights. Use clean infield conditioner as topdressing on your mound consistently. Make sure it all gets swept out of the area around the pitching rubber and in the landing spots after every game. Your goal each game day is to add fresh mound clay out of the bag to stress spots on the mound. Please buy some mound tarps and use them. Use them all the time. Use the mound tarp on a rainy day or a sunny day…just use them every day, so the mound keeps consistent moisture. Finally, when going into winter, insulate the top of the mound and the landing area with some pink or blue housing insulation and then tarp the mound before the first freeze. This will minimize heaving of the clay during winter and have it ready to go earlier in the spring.
Joey Stevenson, Indianapolis Indians
Mound maintenance and construction is a crucial part to any successful sports field operation. Our assistant groundskeeper, Joey Gerking, oversees the mounds to ensure they are consistent from bullpen to game mound.
Choosing the right products saves us issues down the road. The majority of our mounds are composed of our infield mix. Our infield mix is around 60% sand, 18% silt, and 22% clay. From there the “bell,” the landing area and the area around the pitching rubber, is 3-4 inch layers of gumbo clay. This clay is >95% clay and is considered a high impact/durable clay.
Moisture management is the most important aspect of mound maintenance. Gumbo clay is high maintenance clay and must be covered with a mat or tarp when not in use. If left uncovered this clay will crack and chip out very easily. So this clay can only be used at facilities with a mound tarp and access to moisture. There are other clays more suitable for extended use periods or facilities without tarps and access to water.
A schedule of our mound maintenance is as follows: Each morning the tarp is removed and the moisture is checked. If the clay has good moisture, a hitting mat will be placed over the gumbo clay and the sides will be left exposed to allow them to “firm” up. Around noon we will tarp the entire mound and this mound stays in place until 30 minutes before each game. After each game the conditioner is removed and a light coat of moisture is added and the mound is packed with fresh clay. We then cover up the gumbo clay with a light layer of infield mix and new conditioner. A light coat of water is added to the entire mound and then tarped…repeat 72+ times.
Chad Laurie, Buffalo Bison
During baseball season, the pitching mound requires daily maintenance and regular renovations. After every game, the damage that pitchers do is repaired using black gumbo packing clay. This clay has a very high clay content and is only installed on the table top and front slope. The rest of the mound is constructed of our infield mix because there is considerably less traffic on it.
As soon as the game is over, the damage is swept clean of any loose material and conditioner, then watered and repacked with clay. The entire table top and front slope are watered at this time with a light fan nozzle so that the moisture in this high clay area can be controlled better. After the repacking is complete, the remaining parts of the mound are cleaned of clay chunks and fresh conditioner is added to the mound. The mound is then covered with a tarp to maintain moisture and stays covered until after lunch the following day. Once the tarp is removed, an Astroturf mat is placed on the front slope to keep the moisture in the clay. This Astroturf cover will stay in place until we are ready to prepare for the game. Keeping the packing clay covered once it has proper moisture is essential to a well-performing mound.
Along with daily maintenance, the pitching mound goes through a number of minor renovations through the season. About three to four times year, all the conditioner is stripped from our mounds and packing clay is added anywhere the front slope and table top are low. Then the rest of the mound is scratched up with a small garden cultivator and infield mix is added to maintain the shape of the mound. This also gives us the opportunity to add fresh conditioner to the entire mound surface.
Building a mound
By Michael Boettcher, Milwaukee Brewers
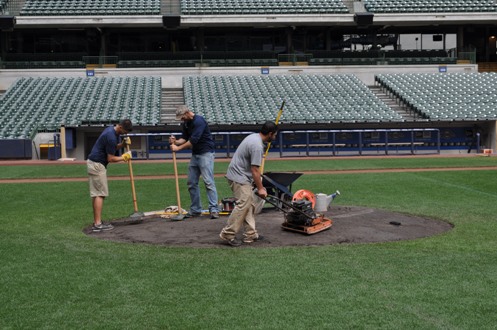
Every play in baseball starts with a pitch. That pitch starts on the mound. The mound starts with us groundskeepers. The steps we take to build our mounds, no matter the level, plays such an important role in the game of baseball. Here is a step-by-step process to help build that quality mound:
- Confirm grades/elevations/position of your mound as it relates to home plate and the rest of the field. Establish your 18-foot diameter, providing a great starting point for your build. Place forms for positioning of rubber or plateau, if available.
- Select a clay material that best suits your field, location, level of play, ability to maintain it, etc. You need to make sure that the mound will hold up under the constant digging, landing and traffic. Clay products are generally your best choice since they become firm when compacted, allowing pitchers great footing for leverage/stability, while providing a cushion for landing. There are several types of mound clay available. In Milwaukee, we have found success using a gumbo clay.
- Begin the build with bagged clay. Add clay in 1-inch increments. Compact by using hand tamps (ideal) or vibrating compactor after each inch of material is added, ensuring your mound won’t settle after you complete your construction. Once within a ½ inch of grade, dig out the location for your rubber, place it and confirm measurements. Use smaller hand tools and pack clay all the way around the rubber to set it and eliminate shift.
- Once you have your rubber set, start to shape and determine the sizes of your plateau and landing. The use of string line, forms, levels, gauges, etc., will help with the establishment and confirmation of measurements from initial build, all the way to finish product. The use of a sand/silt/clay blend material for the transitions of the mound to the grass edges can help with edge integrity.
- Once built, confirm all measurements are correct. Adjust as needed. After you are set, you can begin with the management of your mound. With precision application of water and use of a conditioner to manage that moisture, a quality mound should be yours.
- Dress it to your liking and Play Ball!
- Don’t forget the Maintenance! Every quality mound needs it. Patch after every use, if possible. Do yourself a favor and tarp it . . . your mound depends on it!